
It goes without saying that everyone here has adjusted the contrast and levels in a picture. This tutorial will show you a way of safely using Auto Levels and a better way to adjust the contrast. All this can be built into an Action Script that can be turned into a droplet for drag and drop batch processing.
Introduction
Learn how to harness Photoshops automated processing power. Want access to the full PSD files and downloadable copies of every tutorial, including this one? Join Psd Plus for just $9/month. You can view the final image preview below.
Tutorial Details
- Program: Photoshop CS4
- Difficulty: Beginner
- Estimated Completion Time: 20 minutes
Step 1
OK, fire up Photoshop (get a coffee if your computer is slow as) and open up any old picture file (Command + O) that you have or one you just shot on a camera. I chose this one right here: Tree.

Step 2
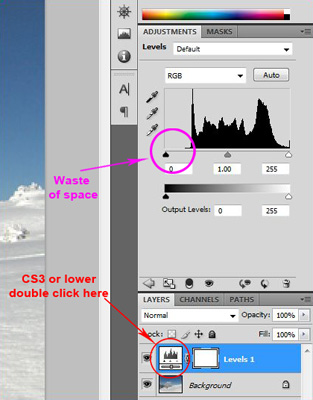
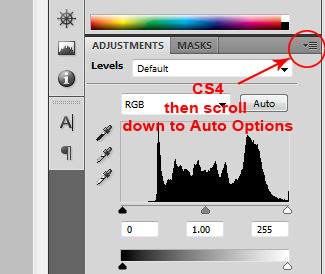
As you may have guessed, the levels in this photo are average at best. What we need to do is to fix this with one click. First, create a new adjustment layer for levels (Layer > New Adjustment Layer > Levels). If you are using CS4 then you will have the adjustment parameters in a box above the layers, if not, double-click on the levels icon in the adjustment layer to bring up the properties box.
Step 3
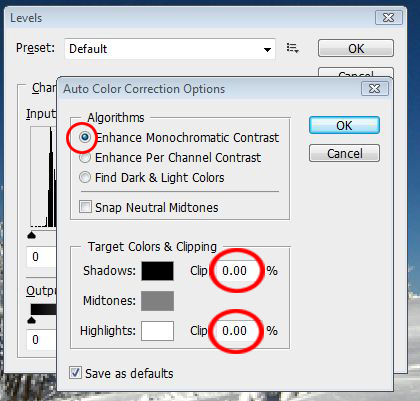
Now we know that we move the sliders to clip to the end of the blacks and the end of the whites. If we want to batch process these though, this would not really be a solution. Click on the Options box under Auto box to bring up the Auto Color Corrections Options. In CS4 for an adjustment layer, they are found if you click on the tiny options box, as shown below.
Step 4
Now that the box is open, we want to change two settings. Change the Algorithm to Enhance Monochromatic Contrast and change the clipping levels to 0%. This changes the contrast but not the color balance unlike the standard settings that bring the Black and White level points to the end the range. We don’t want to change the color in the levels.
Note: Try both ways and see the difference, we to leave that as a separate step so we have complete control over what we do. Also check the save as defaults button.
Step 5
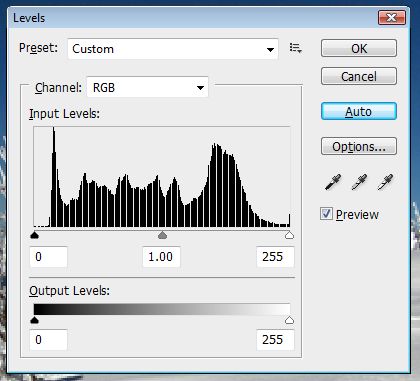
Right, now that’s the default, every time you hit Auto, the Levels will be fixed and you don’t have to worry about losing data and as it’s on an adjustment layer, its completely reversible (You: 1, Photoshop: 0).
Step 6
This next step is much cooler than level adjustments, as most cameras now are good at taking pictures and get the levels fairly good. Contrast can add amazing definition to your photos in a second. Most people including myself use the standard S curve. That’s fine, but it also affects the colors of the picture which we don’t want.

Keep working on a picture of a tree…or open up this Leopard image – smile because there is probably someone still working on that tree. Select the Background Layer. Go to the Channels and Command-click on the layer RGB. You should now have a selection on your image.

Step 7
Go back to the layers tab. Make a new adjustment layer for the curves (Layer > New Adjustment Layer > Curves). Rename the layer Highlights. You should now have a curves adjustment layer with a mask on it. This mask makes it so that we only adjust the highlights and leave the shadows as they are.

Step 8
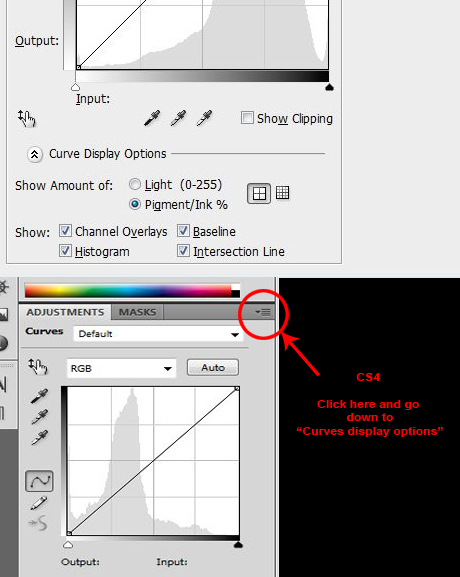
OK, this is where the changes start to happen. Go to your curves adjustment box and go to Curves Display Options. Where it says Show Amount Of, change it to Pigment/ink%. Stay with me here you and will see why in a minute (yes I know that’s for print work). CS4 users you will have to click on that little box and scroll down to Curves display options.
Step 9
Click in the middle of the curve. Its not critical to get this dead accurate but I personally prefer it because of what we are about to do. Oh and I changed it to Pigment as if you notice the boxes Output and Input now read 50, 50. You can leave the display on Light and it will read 128, 128.
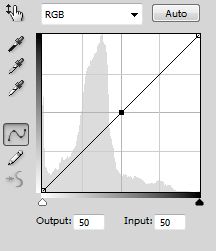
Now click inside the Output box. Now press the Down Arrow key. The number should go to 49. Keep pressing down until you get to 45. I usually move in increments of 5. If you hold Shift + Down Arrow key, then you move in increments of 10. Or you can type 45 which is easy.
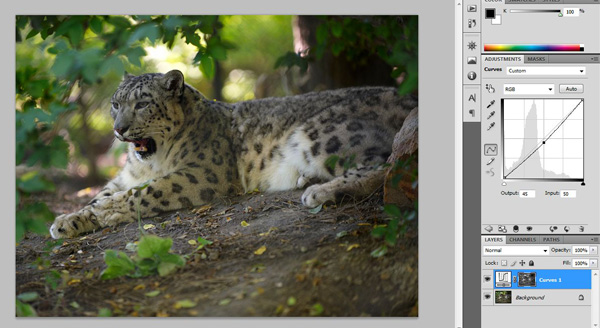
If you look at your photo now, you have successfully increased the highlights and left the shadows alone thanks to the mask. Note: The leopard photo may need numbers like 40—35 to notice a worthwhile difference.
Naturally you have probably grabbed the point and yanked it all the way down to 0 (if light 256), which is good as you can see how this effects the photo. I usually move in increments of 5 for reasons you will see later. Its also easier to work out of a range of 100 than 256 as for simpler math. Hence I use Ink% display. You can work in light though, just remember to increase the number to 150 or so. This is how I work, if you like to just rip the curve around and don’t care about numbers that is fine.

Step 10
Now we will modify the Shadows. First, Duplicate the layer Highlights, Command + J. Rename this layer to “Shadows.” Click on the layer mask to select it and then press Command + I to invert it or go to Image > Adjustments > Invert. Now click on the curves point at 45 and move it to 55. Now we are affecting the shadows only.

Rule of thumb is to go with what looks good by eye. I find that if I adjust the highlights by 10, the shadows need to be adjusted by 5. Depends on your camera, and it depends on your photo conditions. Tr what works for you or move the curve until it looks good.
Depending on your picture, sometimes you may want to tighten the masks on the Curve Adjustment layers up. Click on a mask and open the levels (Command + L). Now click on options. I use about 5% so the mask is better. It doesn’t matter if you lose a bit of detail here, as its only as mask. If you want to automate all this, keep reading.

Step 11
If you want, group the two (three if you did a levels layer) layers together by selection them all (Command click each one) then Command + G. And be sure to name the group.
So far this process demonstrated takes way too long. You may be thinking: “how can I batch process this?”
Step 12
Now we get into the realm of Action scripts. These are great for saving time by automating simple tasks, or if you invent a cool process that you may want to reuse.
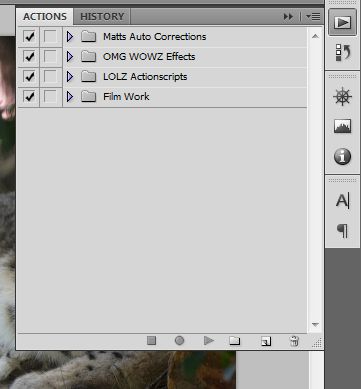
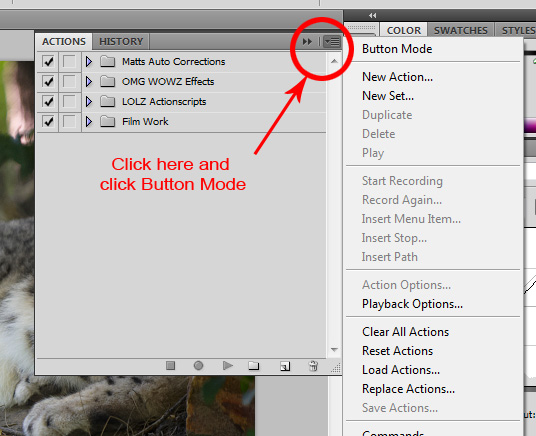
Open the Actions window, Window > Actions, or Alt + F9. You should get a box like that shown below.
This is where we are going to make an Action Script so that when we press a button, all that work in steps 8—12 are done instantly.
Click the Create New Set button and name it. Then select that folder and click the Create New Action Script button. Name it “5% Highlights.”

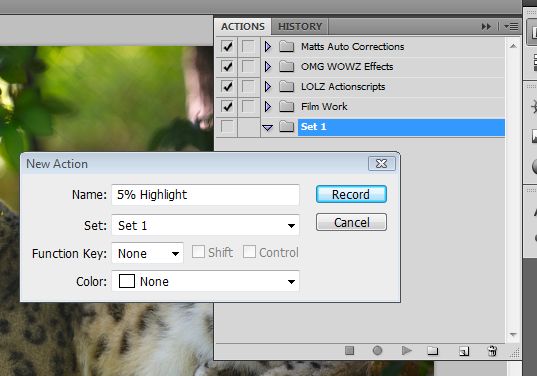
Now Press Record. Here is the fun part. Go and do Step 9 again and set the Curve output at 45. If you want to clip the mask, Press Command + L on the mask and go to Options. Where it says Clipping change that to 5 in Black and 5 in White. These numbers I find work, but experiment. Don’t check save as a default though! Photoshop will record what you do and save it as a sort of list. When you’re finished, press Stop.

You should now see a list of actions. If you want to see if your script works, delete the layers on your image and press the Play button (next to record) with the background selected. You should now have an adjustment layer with 5% boost on the highlights.
Make a New Action Script. Name it “10% Highlight.” Repeat Step 12, but instead make the Curves Output 40. Remember to clip the mask if you want to be consistent with your looks. Go thought this process, each time starting from scratch and increasing the Output amount until you get to something like 40% Highlights. I’d say it would be rare to go above that, but its up to you.
Do the same with the shadows and remember to invert the mask and clip it as you did for the highlights. Make an Action Script for Auto Levels as well.
Soon you should have a folder that is full of scripts that add adjustment layers to adjust the contrast by a certain amount, and fix the levels. If you accidently made a mistake in one step in your script, then go to the action you messed up and click on the trash can icon (located next to the Create New Action Script button). You can press Play and Record from any point in the script.
Now you never have to do that again and can just press Play or click on a button to add contrast and fix the levels. If you want to see the difference in your image, hide the layer group and turn it back on again. Also, make a new Curves Adjustment Layer, then make the standard “S Curve.” Turn the layer on and off to see how the two methods compare.
Step 13
Now is the batch process part. Make an action script that includes the Auto Levels adjustment, Highlights at 10% ,and Shadows at 5% all in one script. You can change these to whatever you’re happy with or you can make multiple scripts for different situations.
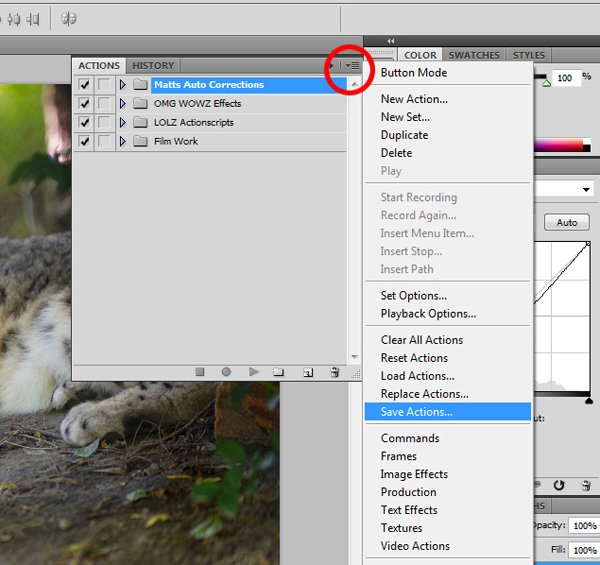
While you are building your Batch Processing Action Script, keep recording once you’ve finished and save it as either a PSD or a JPEG or whatever you want to save your processed files as. With PSD, changes are easy and non-destructive, it just takes more space on your hard drive. Finally, Save you actions where you choose.
To make a droplet simply go to File > Automate > Create Droplet. The dialogue below will come up.

Name your droplet, Then choose which folder the action will be found in. Then move down and select the action you want to make a droplet for.
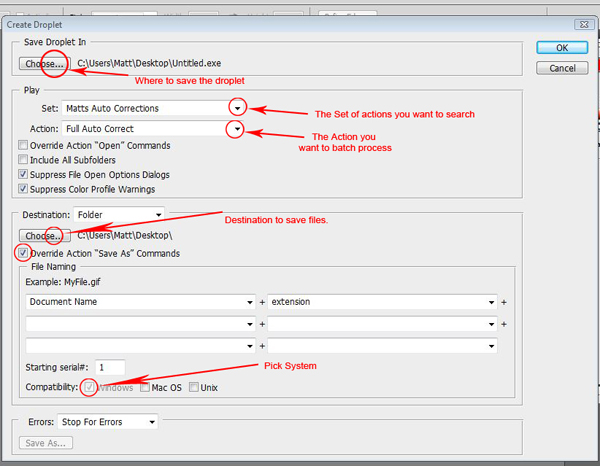
Select a folder you want to save your files in and then select the naming scheme you want. Check the Override Save As box unless you want photoshop to pause on every photo with the Save As dialogue box. Then save it somewhere that you will use it. I chose the desktop.
Drag and drop your file or folder onto the .EXE droplet and then run out of the room as Photoshop should open each file and run the action script on it and then save it to wherever you specified. Test if before batching a large number of images. This makes your computer look smart doing work without anyone touching it.
Conclusion
Great, that’s it. Now you should know a better way to add contrast to photos, as you don’t effect the color and can control the highlights without affecting the shadows and visa versa.
The Auto button is now useful on levels and you can make an action script that can batch process files. Bare in mind that this method is not designed to create the final look of a high quality photo, but it’s a start. While the method demonstrated in this tutorial takes time to set up, once it’s Action Scripted it becomes really fast to use.
No comments:
Post a Comment